Sakura Anpan (Sweet Bean Paste Filled Buns with Cherry Blossoms) with a Bread Machine. Since it's cherry blossom time, I added salt-cured sakura Sticky Rice Cake with Red Bean Paste Recipe with step-by-step pictures and video - Sweet and fresh. Crispy on the outside with a gooey texture inside. Anpan is Japanese Red Bean Bun, made of soft sweet bread stuffed with a sweet red bean paste filling.
 Take warm, flaky strawberry and matcha pastries to the next level with sweet bean paste.
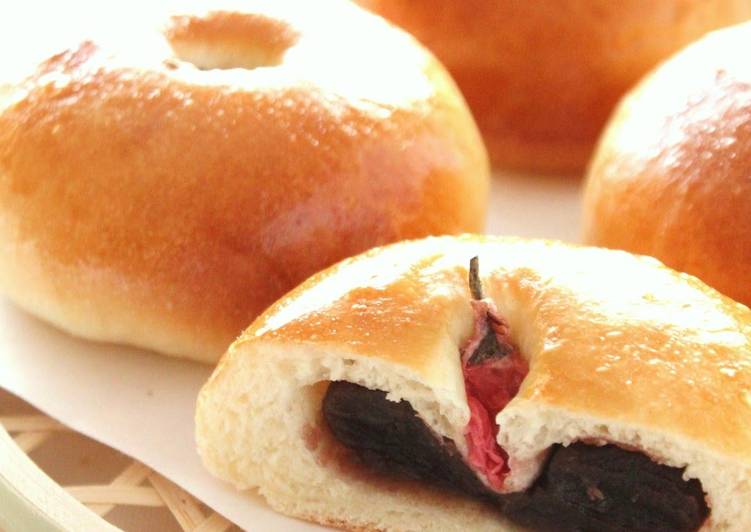
Sakura Anpan (Adzuki Bean Paste Bread).
Combine white bean paste, powdered strawberry and sugar and mix well.
You can cook Sakura Anpan (Sweet Bean Paste Filled Buns with Cherry Blossoms) with a Bread Machine using 12 ingredients and 26 steps. Here is how you cook that.
Take warm, flaky strawberry and matcha pastries to the next level with sweet bean paste.
Sakura Anpan (Adzuki Bean Paste Bread).
Combine white bean paste, powdered strawberry and sugar and mix well.
You can cook Sakura Anpan (Sweet Bean Paste Filled Buns with Cherry Blossoms) with a Bread Machine using 12 ingredients and 26 steps. Here is how you cook that.
Ingredients of Sakura Anpan (Sweet Bean Paste Filled Buns with Cherry Blossoms) with a Bread Machine
- Prepare 200 grams of Bread (strong) flour.
- It's 3 tbsp of Sugar.
- It's 2/3 tsp of Salt.
- Prepare 30 grams of Unsalted butter.
- It's 20 grams of Egg (whole).
- Prepare 110 ml of Water.
- You need 2/3 tsp of Instant dry yeast.
- You need of For Toppings.
- It's 240 grams of Koshi-an (smooth sweet bean paste).
- You need 8 of Salt-cured cherry blossoms.
- You need of To brush on the bread:.
- Prepare 1 of Egg (glaze).
Do the same for the matcha paste. Making Sweet Red Bean Paste (Anko) from scratch is easier than you think. You only need azuki Whether it's Daifuku Mochi, Dango, Dorayaki, Taiyaki, Manju, or Anpan, they are filled with Anko As mentioned earlier, sweet bean paste is not only made from azuki beans but also made from white. Bean paste, or an, is a popular sweet treat used to top and fill a wide variety of Japanese confections.
Sakura Anpan (Sweet Bean Paste Filled Buns with Cherry Blossoms) with a Bread Machine step by step
- Gently rinse the salt off the cherry blossoms, and pat them dry with paper towels..
- Divide the anko into 8 portions and form them into balls. Cover with plastic wrap. ※ Each portion weighs about 30 g..
- Put all the bread dough ingredients in the main bread machine compartment except for the yeast, and put the dry yeast in the yeast container. Press Start..
- The program to use will vary depending on your bread machine. Choose the one that will allow you to take the dough out after the 1st rising to form as you please..
- After the program is done (after the 1st rising), take the dough out..
- Weigh the dough and divide into 8 equal portions. Round each portion of into a smooth ball. For reference: The entire amount of dough weighs about 400 g, and 1 portion is about 50 g for a total of 8 portions..
- Cover the balls of dough with a tightly wrung out moistened kitchen towel so that they don't dry out. Leave to rest for 10 minutes..
- Press the dough balls evenly to deflate them and to make then about 10 cm in diamater. Put a ball of anko in the center. Make sure the thickness of the dough is even all over!.
- Bring the top and bottom edges of the dough over the filling first..
- Then bring the left and right sides over the filling in the same way. Pinch the dough tightly sealed..
- Put the buns on a kitchen parchment paper lined baking tray with the seam sides down. Repeat for all 8 buns..
- Keep the dough covered with the moist kitchen towel as you work. Cover the dough on the tray with a piece of canvas..
- When all the buns are formed, press lightly down on each bun. If you do this with the canvas covering the buns, the surface will be nice and smooth..
- Put some bread flour (not listed in the ingredients) on your finger, and make a dent in the middle of each bun. Press down to about 1/3 of the depth of the bun..
- If you press straight down with your finger the dough may tear, so go in a bit diagonally to make the dent..
- Put a cherry blossom in the dent. Repeat for all 8 buns..
- Cover the buns with the piece of canvas cloth and then a tightly wrung out moistened kitchen towel. Leave to rise (2nd rising) for 15 minutes at 40°C Preheat the oven to 40°C beforehand..
- After letting the buns rise in the oven for 15 minutes, leave to rise for 10 to 15 minutes at room temperature. You need to take the buns out before they are done rising since the oven needs to be preheated for baking..
- Preheat the oven to 200°C. Start preheating it once you have taken the tray of buns out of the oven..
- The buns should rise enough that they are about doubled in volume. ※ This is the same even if you let them rise at room temperature for the whole 2nd rising..
- Brush the surface of the buns with egg wash. Brush them down to the bottom for a nice looking finish after baking..
- Bake in a 200°C oven for about 12 minutes, or 12 to 14 minutes..
- Check the buns after 12 minutes. Take them out once they are as browned as you want them to be..
- Cool the baked buns on a cooling rack. When they have cooled down, they're done!.
- The buns look like this when you cut into them. The dough is pressed out in Step 8 in order to ensure the anko filling is distributed nicely, so be sure to press the dough out evenly..
- When adding the dry yeast and flour etc. to the bread machine, make sure the yeast and salt are not touching each other..
Filled with koshian, red bean paste pressed through a fine sieve, sakura mochi is typically enjoyed as part A monaka decorated with a chrysanthemum crest design. Flatten the bun gently and make incisions on the side with a knife and top with walnut pieces. Relying on the same concept of anpan (Japanese soft bun with sweet fillings), the sakura anpan is bread that is filled with a sweet bean paste combined with cherry blossoms. If you cannot get your hands on a sakura anpan, why not try to make your own version of the Sakura Anpan at home? He first started to sell anpan in Ginza and the rest is history!